Payroll export
Export leave with pay codes from Rotaleave for payroll — Generic CSV, Xero or QuickBooks formats, with unmapped-code warnings.
Updated 13 October 2026
The Payroll tab in Reports turns a pay period’s leave into a coded CSV your payroll software can digest. It’s admin-only, and it only appears once an admin has switched on Payroll export under Settings → Organisation → Features.
Map your pay codes first
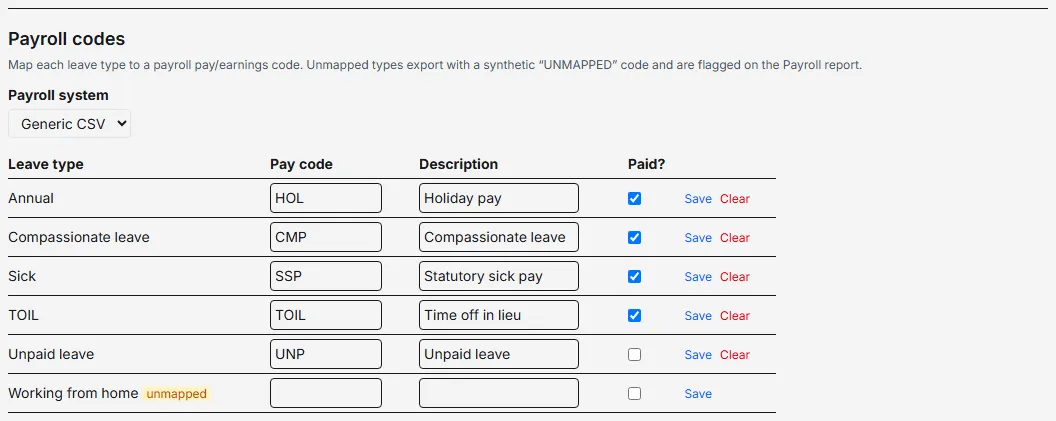
Each leave type needs a pay code. Under Settings → Leave → Leave types, scroll to the Payroll codes section (it shows once Payroll export is on). Pick your payroll system — Generic CSV, Xero or QuickBooks — and give every leave type a code, a description and a paid flag, then Save each row. Codes are kept separately for each payroll system. Anything left unmapped is exported with the code UNMAPPED; the table flags it with a ⚠ and the CSV has an Unmapped? column, so nothing slips through silently.
Run the export
On Reports → Payroll:
- Set the From/To dates for your pay period and any department or team filter.
- Pick the Payroll system.
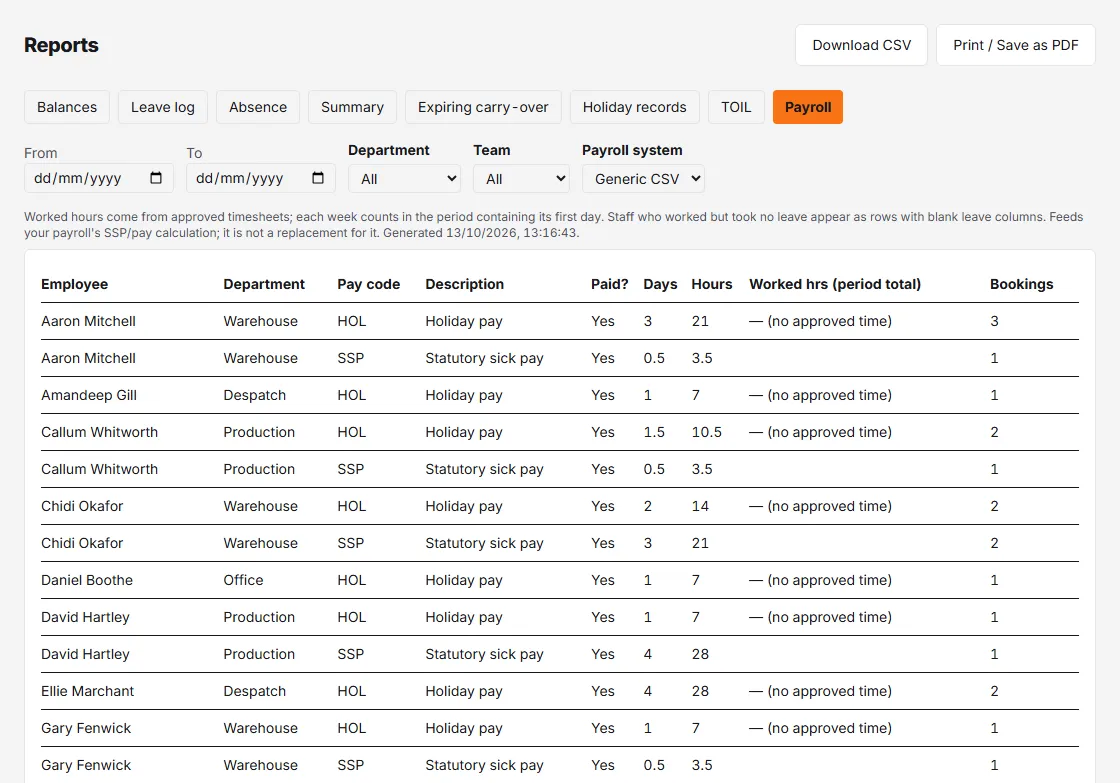
- Review the table — one row per person per leave type: pay code, description, whether it’s paid, days, hours and the number of bookings. A warning banner counts any rows using an unmapped pay code, with a Set pay codes shortcut to fix them.
- Click Download CSV. The file is named with your From and To dates, and adds a category (leave, sickness or unpaid) and an unmapped flag for each row.
What it is — and isn’t
The page says it plainly: “Feeds your payroll’s SSP/pay calculation; it is not a replacement for it.” Only approved leave is included, never pending, declined or cancelled bookings. Rotaleave gives payroll clean, coded absence data; statutory pay maths stays in your payroll system. The export holds hours and days only: it carries no pay rates or money amounts. (Pay rates, where an organisation uses them, feed the labour-cost figures on the rota, not this export.) The Worked hrs (period total) column shows each employee’s total hours from approved timesheets when clock-in is switched on for your organisation (it normally is; Settings → Organisation → Features → Clock-in & timesheets). Each week counts in the period that contains its first day, the total appears once per employee (on their first row), and someone who worked but took no leave gets a row with blank leave columns. With clock-in off the column shows ”— (pending clock-in)”, and an employee with no approved time shows ”— (no approved time)”. For a day-by-day breakdown, see the timesheets CSV export.