Set up your organisation
The Rotaleave setup wizard: where and how you work, features, leave year, allowances, leave types, bank holidays, working hours, people and approvals.
Updated 13 October 2026
The setup wizard launches automatically when an admin with unfinished setup lands in the app (once per browser session; if a practice company is offered, that comes first), and lives at Settings → Data → Setup wizard whenever you want to pick it up again. It’s admin-only and shows your progress as a row of step pills. There is a Back button, and every step except the last has a Skip for now button — nothing forces you to finish in one sitting. If you leave it unfinished, a banner reminds you: “Finish setting up your organisation →”.
Two steps can disappear from the row depending on your answers: Working hours is hidden if people work a fixed pattern and leave is booked in full days only, and Approvals is hidden if you say you are the only approver.
Going through the wizard again later is not just a review. Clicking Confirm on the Your setup step sets the feature switches to what that screen shows, and the screen starts from your answers, not from what is currently on. Anything you have switched on in Settings since — Blackout dates, Approver cover, Labour cost vs sales, Scheduled reports, Payroll export — goes off unless you tick it again (only Integration API is left alone unless you flip it). The same click resets the allowance unit and the half-day and hourly booking settings from your “How is leave booked?” answer, and, if TOIL is ticked, sets the TOIL expiry to whatever is in its box (30 days unless you change it). Check that answer, every switch and the expiry box before you confirm.
Where you work
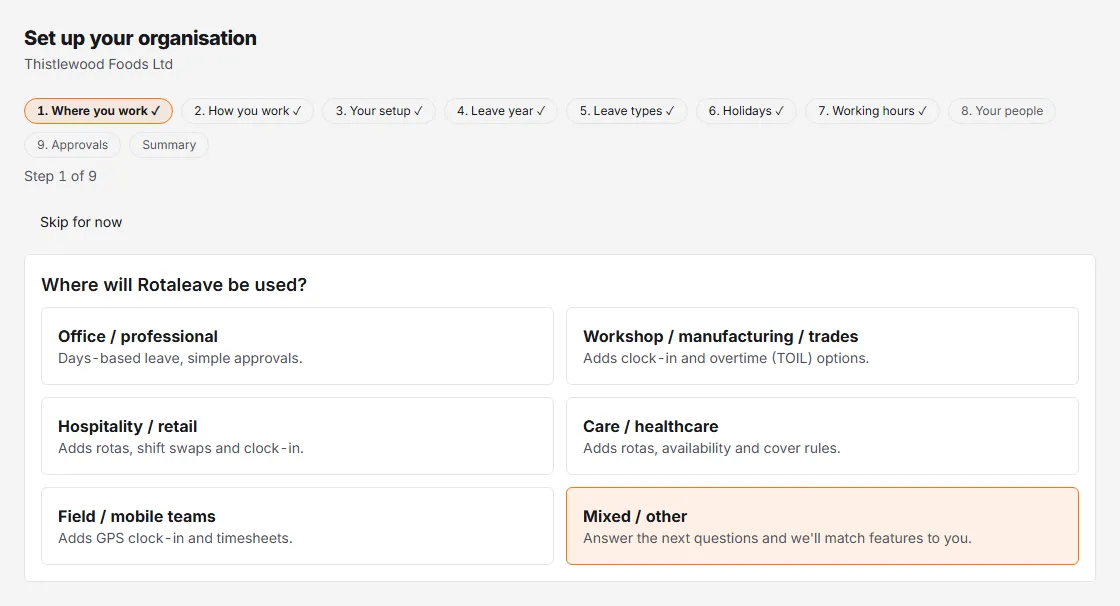
“Where will Rotaleave be used?” Pick the closest of Office / professional, Workshop / manufacturing / trades, Hospitality / retail, Care / healthcare, Field / mobile teams or Mixed / other. Your pick moves you on at once and pre-selects answers to three of the next questions; with Mixed / other nothing is pre-selected.
How you work
Four questions on one screen; Continue stays greyed out until all four are answered. You can change any pre-selected answer.
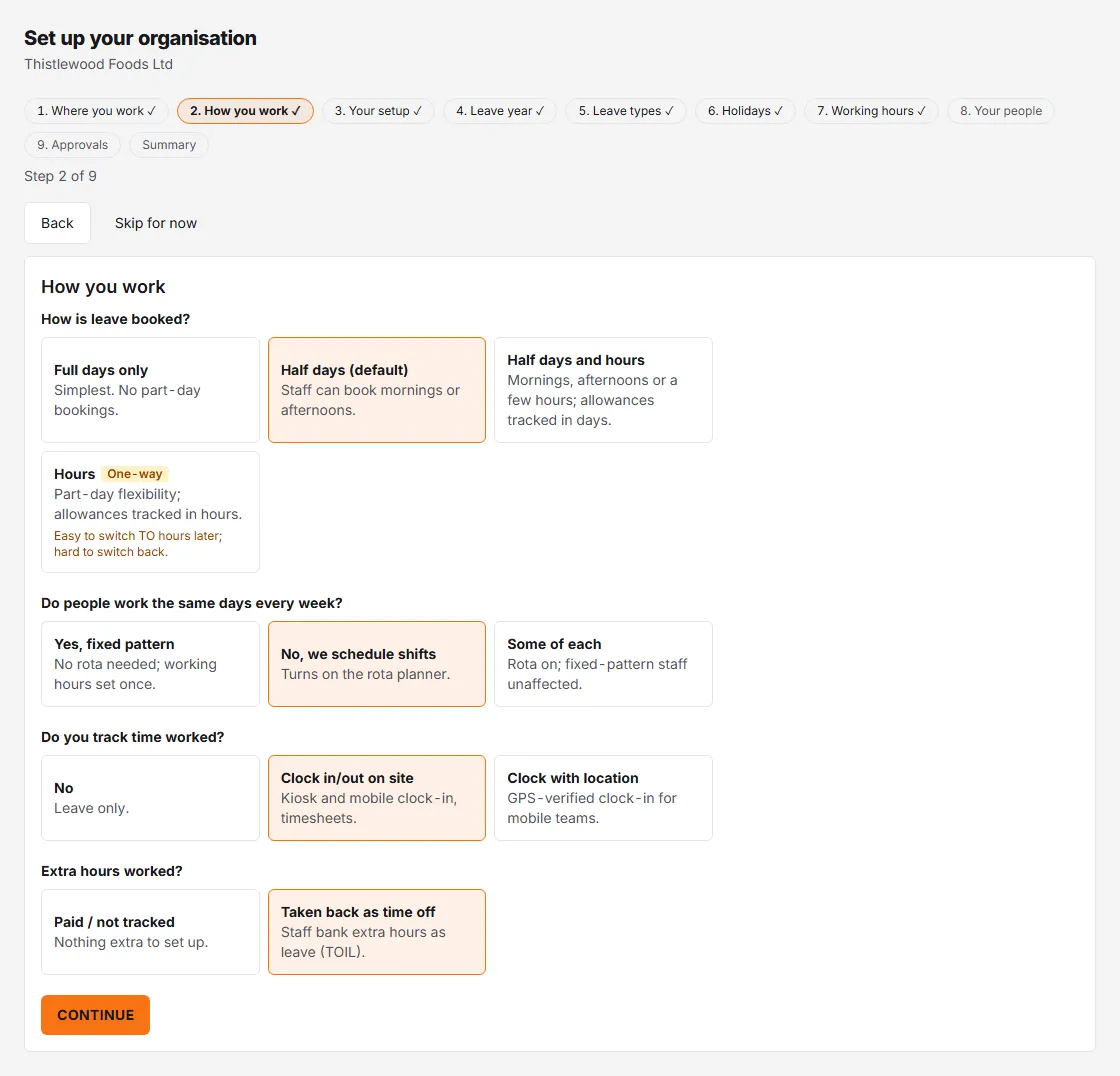
- How is leave booked? — Full days only, Half days (default), Half days and hours (mornings, afternoons or a few hours, with allowances tracked in days), or Hours (allowances tracked in hours). Hours carries a One-way badge: “Easy to switch TO hours later; hard to switch back.”
- Do people work the same days every week? — Yes, fixed pattern, No, we schedule shifts (turns on the rota planner) or Some of each.
- Do you track time worked? — No, Clock in/out on site or Clock with location.
- Extra hours worked? — Paid / not tracked or Taken back as time off (TOIL).
Your setup
A list of features, ticked to match your answers. Rota / shift scheduling is ticked unless you chose a fixed pattern; Clock-in & timesheets if you track time; Shift swaps if you chose Hospitality / retail and anything other than a fixed pattern; TOIL if you chose time off for extra hours; Department cover rules if you chose Care / healthcare. The rest start off. Flip any switch you like, then click Confirm, which applies everything at once: the feature switches as shown, plus the allowance unit and the half-day and hourly booking settings from your “How is leave booked?” answer. Slack, Microsoft Teams and Calendar sync appear as Connect later links.
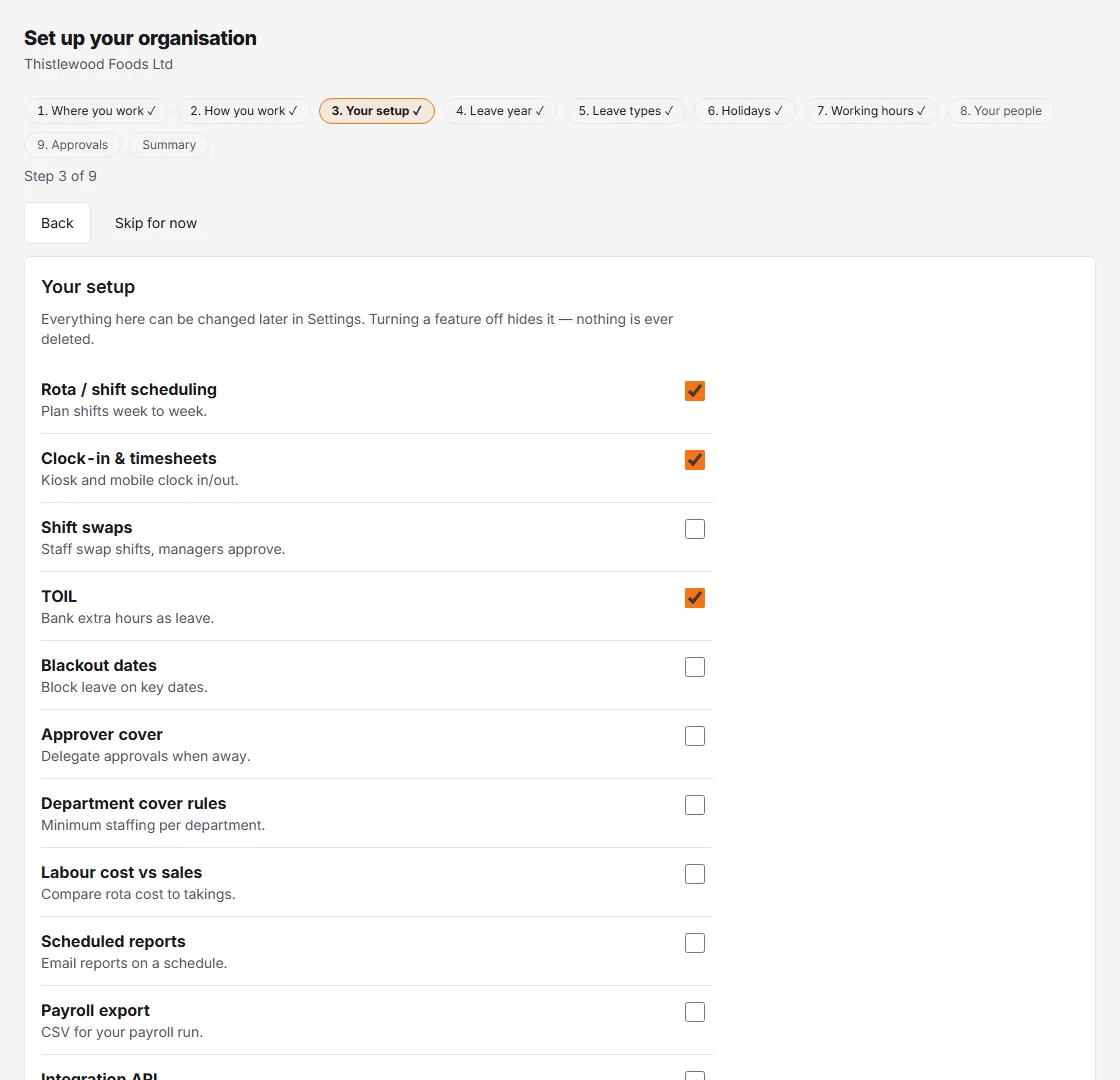
Everything here can be changed later in Settings → Organisation, and turning a feature off hides it — nothing is deleted. If you tick TOIL, a TOIL expires after (days, blank = never) box appears, pre-filled with 30. If a feature can’t be switched on for your organisation, the step stays put and says so; contact support.
Leave year & allowances
This step carries a “Set once” warning: the leave-year start is painful to change once bookings exist, so decide it deliberately. You can still change it later under Settings → Leave.
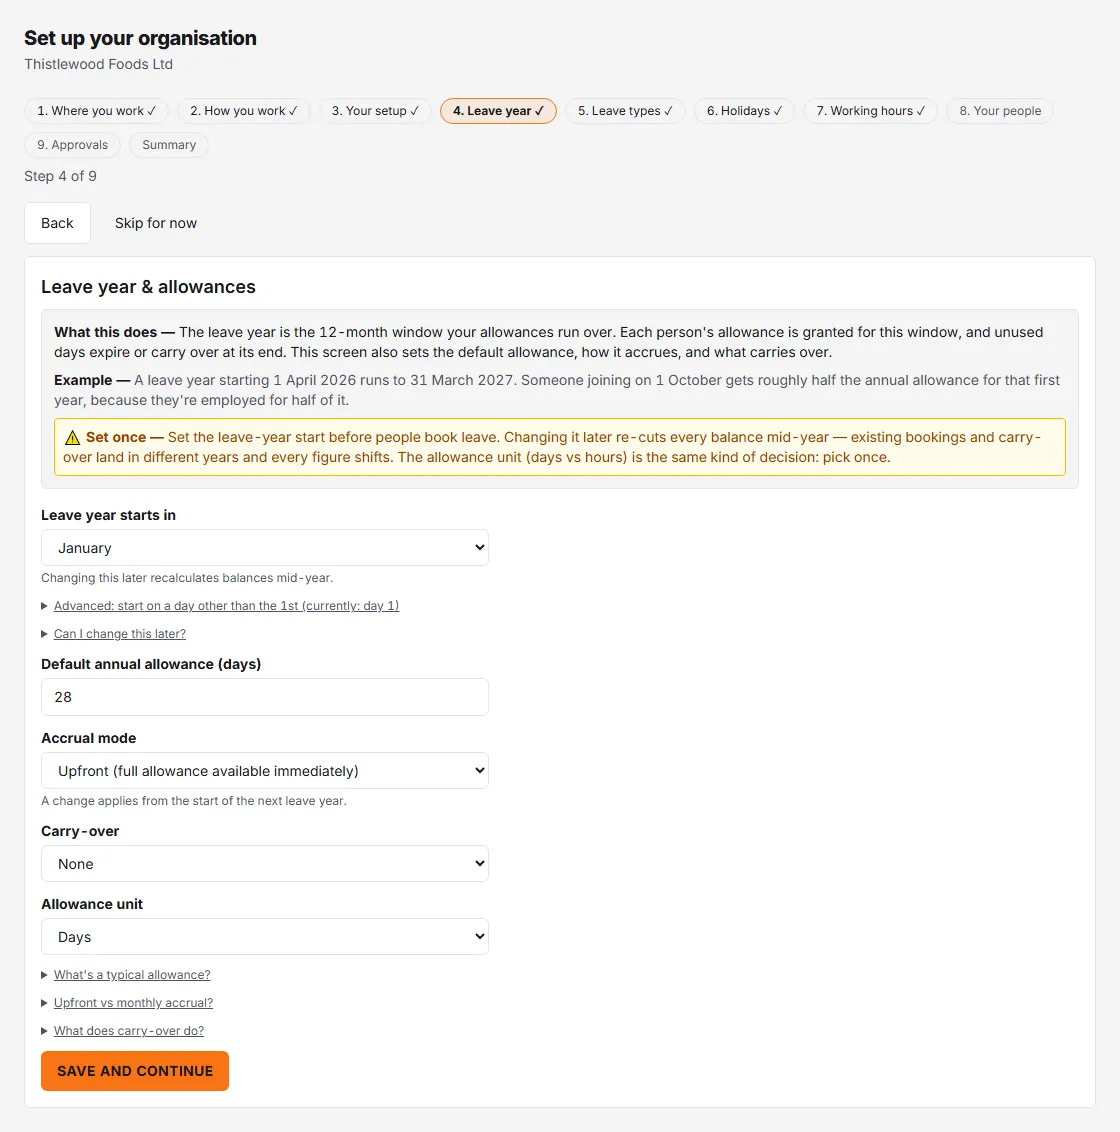
- Leave year starts in — the month your leave year begins. An Advanced option, Start day, lets it start on a day other than the 1st; the wizard’s own tip for the UK tax year is April, day 6.
- Default annual allowance — in the unit shown in the label (days or hours); 28 is pre-filled. You can override per person later.
- Accrual mode — Upfront (full allowance available immediately) or Monthly (accrues over the year).
- Carry-over — None, Capped (with a Carry-over cap) or Unlimited.
- Allowance unit — Days or Hours.
Click Save and continue.
Leave types
A suggested set is pre-ticked — Annual leave, Sick leave, Unpaid leave, Compassionate leave — with Maternity / paternity and Working from home available but un-ticked. If you answered Taken back as time off, a leave type named TOIL is added too. The wizard creates it as an ordinary type that counts against the holiday allowance, not as a TOIL type, so people booking it would use up holiday instead of banked hours. Afterwards, go to Settings → Leave → Manage → Leave types, click Edit beside it and tick TOIL (spends the TOIL bank). Each type has three toggles: deducts from allowance, needs approval, and shows as away. Sick leave is created as a sickness type, which can’t deduct from the allowance. Add anything else with Add type, then Save and continue.
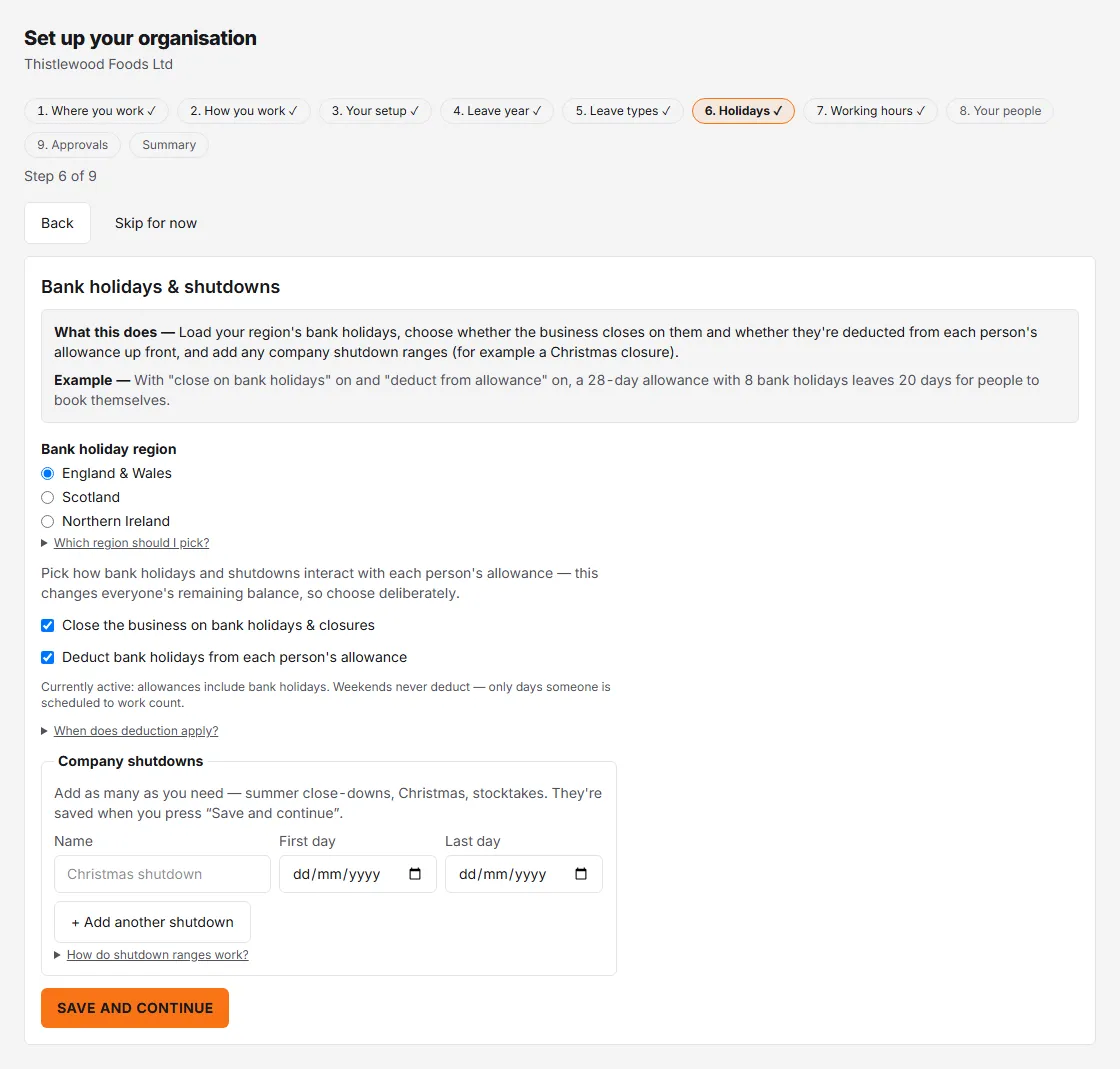
Bank holidays & shutdowns
- Pick your Bank holiday region: England & Wales, Scotland, or Northern Ireland. Saving loads this year’s and next year’s dates.
- Close the business on bank holidays & closures — tick if you shut on those days.
- Deduct bank holidays from each person’s allowance — available only once the box above is ticked. The wizard restates your choice as “allowances include bank holidays” or “allowances are plus bank holidays”. Weekends never deduct — only days someone is scheduled to work count.
- Add Company shutdowns (for example a Christmas shutdown) with a Name, First day and Last day; + Add another shutdown adds a row. They are saved when you click Save and continue.
Working hours
Everyone starts on Mon–Fri full-time. Create working-hours templates here for other patterns — 4-day weeks, part-time, shift patterns — and assign them per person or per department later.
Your people
Bulk-add your team with the staff CSV: Download CSV template, fill it in, Preview, then Import. A checkbox controls whether invite emails go out now or later. Below that is a panel for importing from another leave product (Timetastic, Ento, Leave Dates, Vacation Tracker, Breathe HR or BrightHR). You can skip all of this and invite people one by one from the People page.
This step also asks Will anyone else approve leave? If you answer No, just me, the Approvals step is dropped.
Approvals
Two choices:
- Managers approve (recommended) — no policy needed. A request goes to the managers of the person’s team; if there are none, to their department’s managers, then the managers of any department above it; and finally to the organisation’s admins. An admin can also approve a pending request at any point, wherever it is waiting (unless a privacy block hides that person’s leave from them). In an organisation with no teams, no department managers and no approval policies, active managers can approve too.
- Set up an approval policy — explicit approvers and levels for the whole organisation, built right here. See Approval rules and policies.
You’re all set
A read-only recap of the organisation name, leave year, default allowance, carry-over, leave types and bank holidays, with links to Settings, People and the Wall chart. Click Finish setup and you’re in. Until a second person is in your organisation, a banner at the top of the app says “It’s just you so far” and links to People.
Settings the wizard doesn’t ask about
- Week starts on — the day weeks start, which rotas, timesheets, labour budgets and the weekly who’s-off email follow. Set it under Settings → Rota & attendance. Once weeks are in use, a change takes effect from a future date on the chosen weekday.
- Leave year — can be changed after setup under Settings → Leave; saving re-cuts every balance into the new leave year.