Import from Timetastic
Move from Timetastic with an API token (recommended) or the .xlsx export — preview exactly what will happen, then import.
Updated 13 October 2026
Switching from Timetastic is one sitting’s work: connect with an API token or upload their export, preview, import. Importing is admin-only and lives in three places — Settings → Data → Import / Migrate, the People page’s Import / Migrate button, or during onboarding on the Your people step. (There’s more on why teams switch on our Timetastic comparison page.)
Connect with an API token — the easy way
- Log in to Timetastic as an admin.
- Go to Settings → API and find (or generate) an API token.
- In Rotaleave, set Source to Timetastic — connect with API token and paste it in.
- Optionally set a leave date range to limit how much history comes over — people, departments and leave types are always fetched in full.
- Preview, then Import.
The token is used once for the import and never stored. The API pull is better than the file export: it fetches your real leave-type flags (deducted / requires approval / private) and your actual configured public holidays. Work schedules default to Mon–Fri on import — set proper working hours templates afterwards.
Or upload the file export
- In Timetastic, go to Settings → Export data and download the Excel export — one workbook carrying your people, departments, leave types and holiday history.
- On the Import / Migrate page, set Source to Timetastic (.xlsx) and upload the file unchanged — don’t rename sheets or edit columns.
What comes across
| Column in your export | Becomes in Rotaleave |
|---|---|
| identifies the person (must be unique) | |
| Firstname / Surname | Name |
| Is Admin | Role (admin, else employee) |
| Approver Id | the referenced user becomes a manager |
| Department | Department |
| Manager (Departments sheet) | the named user becomes a manager |
| Allowance for (this year) | Annual allowance (days or hours, as the export says) |
| Start Date | Start date |
| Archived | Active/archived |
| Leave Type | Leave type (created if missing) |
| Start Time / End Time | Start/end dates |
| Booking Id | used to keep re-runs safe |
| Working Days | Work schedule |
| Organisation sheet | Organisation settings (see below) |
Not imported: remaining balances — enter opening adjustments after migrating — and Time in Lieu (TOIL) rows, which are counted in a warning rather than dropped silently. A leave type whose name contains “TOIL” or “lieu” comes across as a TOIL type.
Organisation settings. The file import also overwrites four of your organisation’s settings, every time you run it. The leave-year start month comes from the export (January if the export gives none); the timezone is set to Europe/London; and bank holidays are set both to close the business and to come off allowances, whatever you had chosen. Check the Leave year and Holidays cards under Settings → Leave after every file import. The preview counts this as one “organisation” update. The API pull never touches them. If your people use England public holidays, the file import also adds England and Wales bank holidays for the years your bookings span.
Preview first — always
Click Preview before anything else. Nothing is written at this stage — the banner says so in as many words: “Preview only — nothing has been written yet. Review the counts and warnings, then Import.” You get a table of every entity (people, departments, leave types, bookings…) with Created / Updated / Skipped counts, plus any Warnings worth reading. The Import button stays disabled until a preview exists — the dry run isn’t optional, by design.
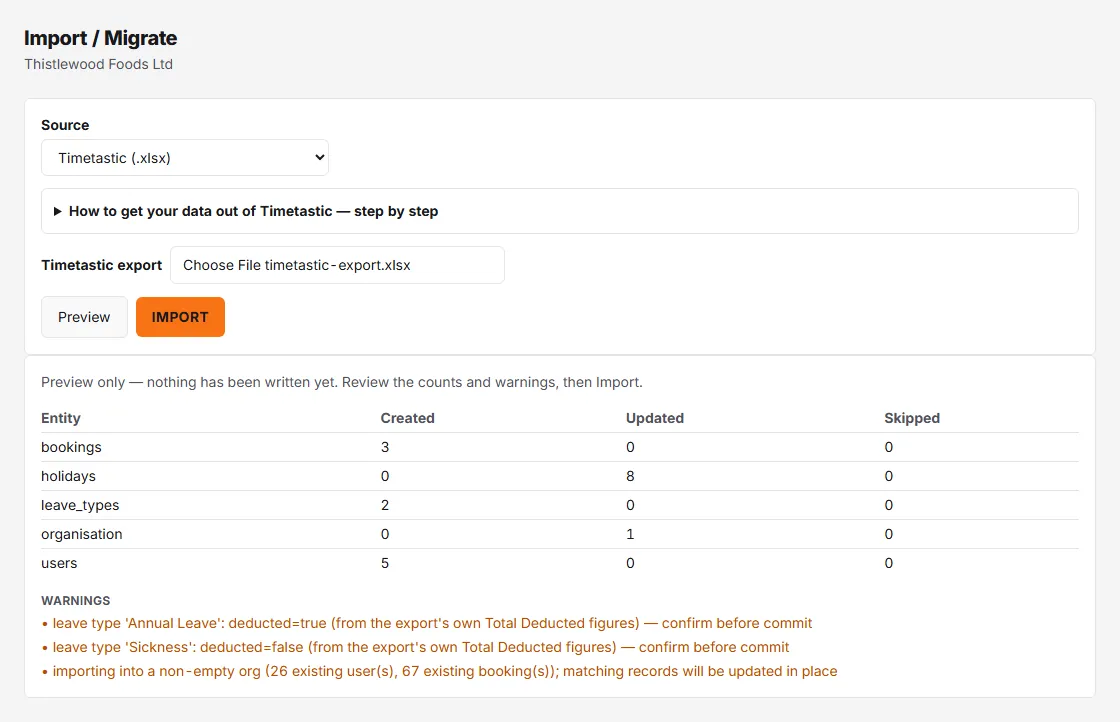
Import
Happy with the counts? Click Import. You’ll see “Import complete.” and your data is live — check the People page and the wall chart. The import is refused if it would leave an organisation with no trial or subscription with more than 10 people, and it can’t be committed from the practice company.
Running it again
Re-importing the same (or a corrected) file never duplicates anything: people are matched by email and bookings by their Timetastic booking id, so they’re updated. But an update puts Timetastic’s values back over what you changed in Rotaleave. All of this applies to the API pull and the file import alike, and to a first import into an organisation that already has people:
- People. A matched person takes Timetastic’s values again — name, role, department, start date, allowance and allowance unit — and their working days are replaced.
- Roles, including yours. Role is set from Timetastic every time: admin if the person is an admin there, manager if they manage a department or approve someone’s leave, otherwise employee. If your own email is in the import and you aren’t an admin in Timetastic, importing takes away your admin role in Rotaleave — and if you were the only admin, nobody in the organisation can give it back. Check you are an admin in Timetastic before you import.
- Archived or not. Status follows Timetastic’s Archived flag. Someone you archived in Rotaleave who isn’t archived in Timetastic is un-archived (back to invited, and counting as a seat); someone archived in Timetastic is archived here.
- Department managers and limits. For every department that comes across, the managers you set in Rotaleave are removed and replaced with the ones Timetastic has for it (the file import puts back only the one manager named on the Departments sheet), and Max people off at once is set from Timetastic.
- Leave types. A leave type with the same name as one you already have has its settings overwritten: colour, whether it comes off the allowance, whether it needs approval, whether it’s private and whether it removes presence. The file import sets it to needing approval and not private; the API pull uses Timetastic’s own settings.
If something looked wrong in the first pass, fix the export and run Preview → Import again. If a file preview fails outright, check it really is Timetastic’s .xlsx export rather than a re-saved CSV.
After the import
- Spot-check a few people’s allowances against Timetastic.
- Decide your bank holiday policy — whether allowances include or exclude them.
- Invite everyone when you’re ready. Importing sends no invitations itself, but it doesn’t stay silent: anyone imported as a current member of staff who hasn’t accepted is automatically emailed a reminder with a sign-up link 2 days after the import, then at 7, 14, 30, 60, 90 and 120 days. The reminders stop once the person accepts, is archived or uses the unsubscribe link in the email, and none are sent while the organisation is closing. People imported as archived get none. There’s no setting to hold the reminders back, so import when you’re ready for people to hear from Rotaleave.